When you purchase through links on our site, we may earn an affiliate commission. Here’s how it works.
How to Use the Built-In Flash on the Canon EOS Rebel T7/2000D
The Canon EOS Rebel T7 (sold internationally as the 2000D) has a built-in pop-up flash that provides fill lighting for dark scenes, backlit subjects, and indoor photography. It’s a small flash guide number 9.2 at ISO 100, but understanding how to control it makes the difference between harsh, blown-out snapshots and well-lit photos with natural-looking illumination.
The flash behaves differently depending on which shooting mode you’re using. In some modes, it fires automatically; in others, it’s disabled entirely, and in the creative modes (P, Tv, Av, M), you get full manual control over when it fires and how much power it uses. This guide covers all of it: how the flash works in every mode, how far it reaches at different ISO settings, and how to solve common flash problems like red-eye and lens shadows.
Flash Range: How Far It Reaches
The built-in flash has a limited range that depends on two factors: your ISO setting and your lens focal length. Higher ISO sensitivity means the sensor needs less light, so the flash effectively reaches farther. Wider focal lengths spread the flash over a broader area but reach farther than telephoto settings, which concentrate the beam into a narrower cone.
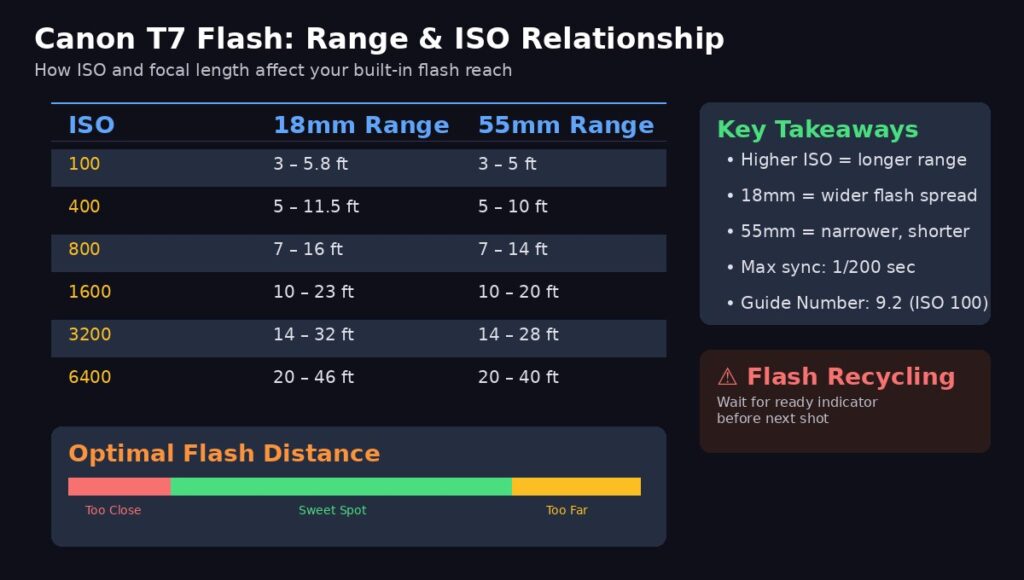
Image Higher ISO dramatically extends flash range from 5.8 feet at ISO 100 to over 40 feet at ISO 6400
At the kit lens’s widest setting (18mm), the flash reaches approximately 3–5.8 feet at ISO 100. That’s barely useful, your subject needs to be within arm’s reach. Raise the ISO to 800 and the range extends to 7–16 feet, which covers a small room. At ISO 3200, you’re looking at 14–32 feet of effective range, enough for most indoor situations.
At 55mm (the kit lens’s telephoto end), ranges are slightly shorter across the board because the narrower field of view concentrates the flash differently. The takeaway: if your subject is far away, raising ISO is more effective than trying to rely on flash power alone.
The camera’s maximum flash sync speed is 1/200 second. The shutter will never exceed this speed when the flash is active, regardless of available light. This prevents the shutter from cutting off part of the flash burst.
Flash Behavior by Shooting Mode
This is where most beginners get confused. The T7’s flash doesn’t behave the same way across all modes some modes fire it automatically, some disable it completely, and some give you a physical button to control it.
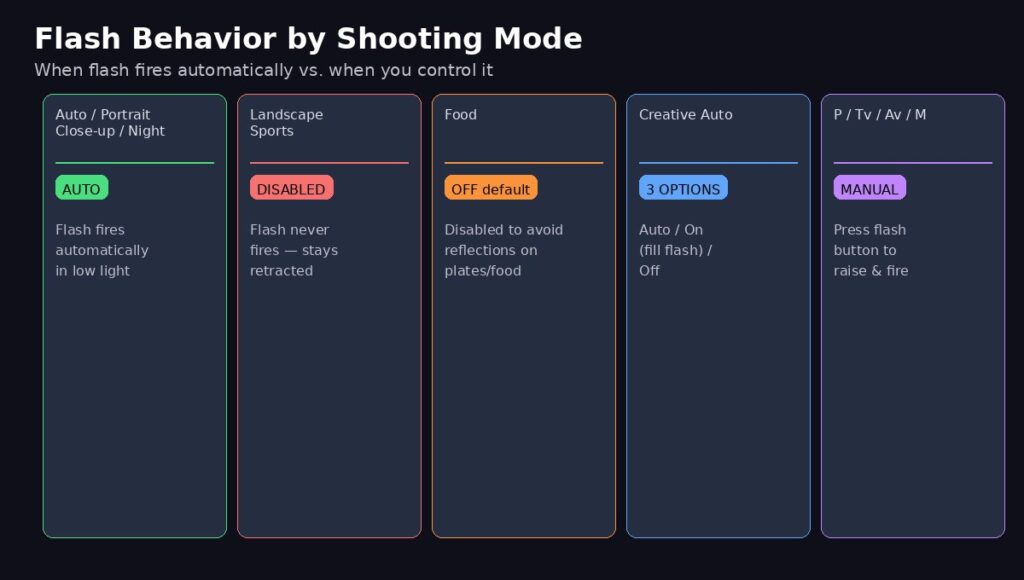
Image Scene modes control the flash for you creative modes (P/Tv/Av/M) put you in charge
Auto-fire modes (flash pops up automatically in low light): Auto, Portrait, Close-up, and Night Portrait. In these modes, the camera evaluates the scene brightness. If it decides more light is needed, the flash pops up and fires automatically. You don’t press anything the camera handles it. If there’s sufficient ambient light, the flash stays retracted.
Flash-disabled modes (flash never fires): Landscape and Sports. These modes keep the flash retracted regardless of lighting conditions. Landscape mode disables it because flash is useless on distant scenery. Sports mode disables it because the recycling time between flashes would prevent rapid continuous shooting.
Food mode: Flash is disabled by default to avoid harsh reflections on plates and glassware. You can override this through the Quick Control screen if you want flash in Food mode, but the default is off for good reason.
Creative Auto mode: Gives you three flash options accessible through the Q (Quick Control) button: Auto (camera decides), On (forces flash every shot), and Off (prevents flash). This is the first step toward manual flash control without leaving the automated modes.
P, Tv, Av, and M modes (full manual control): The flash never fires unless you physically press the flash button, the small button with a lightning bolt icon located between the mode dial and the main dial on the top-right of the camera body. Press it once to pop up the flash, and it fires on the next shot. Press again to retract it.
How to Manually Control the Flash
In the creative modes (P, Tv, Av, M), you have complete control over the flash. This is where the T7’s flash becomes a creative tool rather than just an automatic light source.
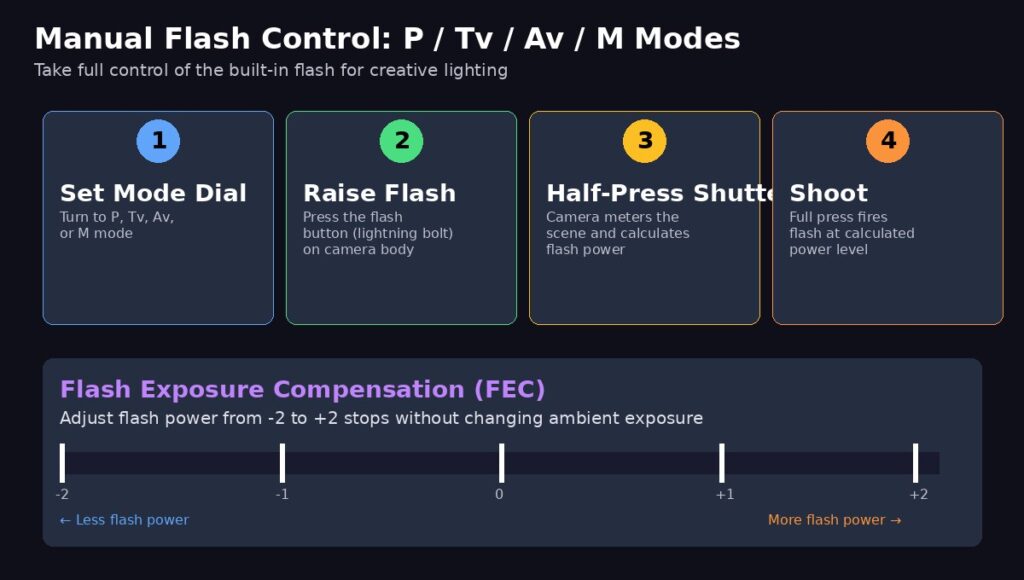
Image Manual flash gives you fill-light capability in bright scenes and precise power control via FEC
Raising the flash: Press the flash button on the camera body. The flash unit pops up and is ready to fire on the next exposure. It stays raised until you either push it back down manually or change to a mode that disables it.
Flash exposure compensation (FEC): This is the most useful flash control for improving your photos. FEC adjusts the flash power from -2 stops (much less flash) to +2 stops (much more flash) without changing the ambient exposure. Access it through the shooting menu or the Quick Control screen. Use -1 to -2/3 for subtle fill flash that doesn’t look like flash at all. This is the secret to professional-looking flash photography in daylight.
Using flash with bright backgrounds: If you’re photographing a person standing in front of a bright window or sunset, the subject goes dark because the camera exposes for the bright background. The fix: use Tv or M mode, set a slower shutter speed (1/60 to 1/30), and pop up the flash. The slow shutter captures the bright background properly, while the flash illuminates your subject. This technique is called “dragging the shutter” or “slow-sync flash.”
Solving Common Flash Problems
Three issues plague almost every beginner flash photographer: red-eye, lens shadows, and the flash overpowering the scene.
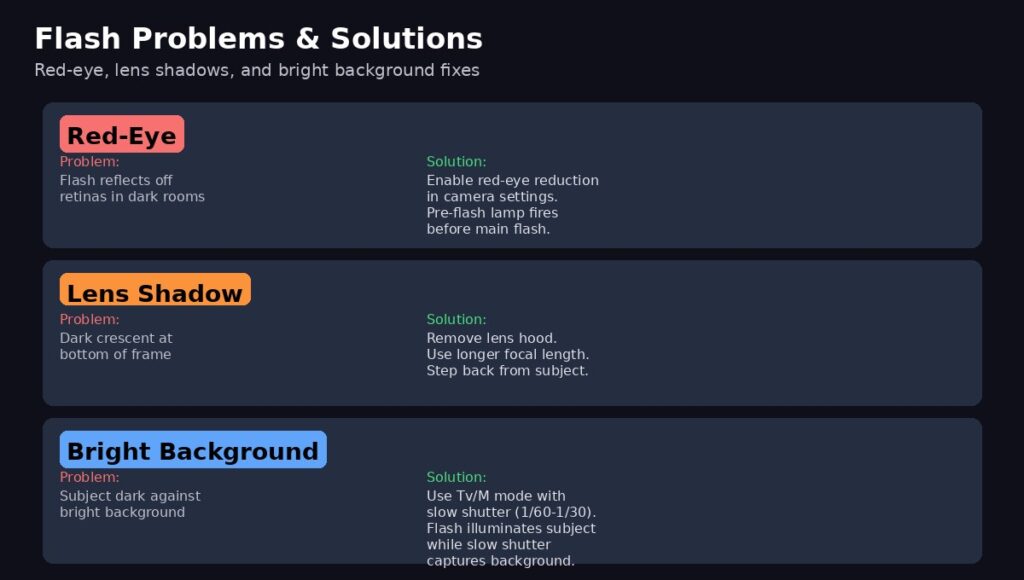
Image Each problem has a straightforward fix most are one setting change away
Red-eye happens when flash light enters the subject’s dilated pupils (common in dark rooms) and reflects off the blood vessels in the retina. The fix is built into the camera: enable Red-Eye Reduction in the shooting menu. This fires a small lamp before the main flash, causing the subject’s pupils to constrict so less light enters the eye. The downside is a slight delay between pressing the shutter and taking the photo.
Lens shadows appear as a dark crescent at the bottom of the frame. They’re caused by the lens barrel (or lens hood) blocking part of the flash beam. This is most common at wide-angle settings (18mm) with the lens hood attached. Fix it by removing the lens hood when using flash, or zoom in slightly to a longer focal length, where the lens barrel doesn’t obstruct the beam.
Flash recycling time is the delay between shots while the flash capacitor recharges. When the flash is recycling, the viewfinder displays a busy indicator and the camera won’t fire. This takes 2–3 seconds, depending on battery charge level. If you need faster consecutive flash shots, a fresh battery helps. For truly rapid flash shooting, an external speedlite with its own battery is the answer.
When to Use Flash in Daylight (Fill Flash)
Many beginners think flash is only for dark rooms, but one of its most powerful uses is outdoors in bright sunlight. When harsh sunlight creates deep shadows under eyes, noses, and chins (especially at midday), a burst of fill flash opens up those shadows and creates even, flattering light on faces.
To use fill flash in daylight: switch to P, Tv, Av, or M mode, press the flash button to pop it up, and shoot normally. The camera’s E-TTL metering automatically calculates the right amount of flash to balance with the ambient light. If the flash effect is too strong, dial in -1 to -2/3 flash exposure compensation for a more natural look.
External Flash Options
The T7’s built-in flash has real limitations: short range, fixed position (creating flat, direct lighting), no bounce capability, and slow recycling. When you outgrow it, the camera’s hot shoe accepts Canon Speedlite external flashes and compatible third-party units.
An external flash gives you dramatically more power (guide numbers of 40–60 vs. the built-in 9.2), the ability to bounce light off ceilings and walls for softer illumination, faster recycling times, and wireless triggering capability for off-camera flash setups. The Canon Speedlite EL-100 is an affordable starting point; the 430EX III-RT or 470EX-AI offer more power and features.
This guide covers the Canon EOS Rebel T7 (2000D). The same flash system, controls, and techniques apply to the Canon T6 (1300D) and T100 (4000D), which share the same flash unit and E-TTL metering system. The T7i (800D) and later models have the same controls but slightly different menu layouts.
See Also
How to Transfer Photos from Canon to iPhone
Navigating the Canon EOS Rebel T7 Menu
Understanding Canon T7 Flash Modes